We recently received a request from a Twitter follower to provide installation details about our custom, home-built teardrop trailer’s air conditioning (A/C) unit . . .
@TeardropAdventu Do you have any write ups on how you vent/drain your A/C on your teardrop?
Teardrop Trailer Air Conditioning (A/C) Unit Installation

- Divide air space outside of A/C unit into three distinct zones:
- Zone 1 at front of A/C unit, where cabin air is pulled in through one set of A/C unit’s front-panel vents, and cooled air is pushed back out into cabin via another set of front-panel vents;
- Zone 2 through mid-section of A/C unit, where outside air is pulled into the A/C unit’s mid-section vents;
- Zone 3 at rear of A/C unit, where hot air from condenser coil is pushed out the back-end vents.
- Provide intake route for outside air to be pulled into Zone 2, where it will enter the A/C unit via the mid-section intake vents;.
- Provide exit route in Zone 3 for heated air at back end of A/C unit to be pushed outside of teardrop trailer (Note: we installed a partitioned roof vent to accommodate both Zone 2 ingress and Zone 3 egress).
- Provide a water collection space at back end of A/C unit in Zone 2 and Zone 3, where water from A/C unit’s internal, built-in drip pan (a result of front-end cooling-coil evaporation) can safely collect and exit the trailer when A/C unit is running;
- When installing a water-collection pan to accommodate run-off water through Zone 2 & Zone 3:
- Make sure teardrop trailer is level;
- Position and secure the water-collection pan at ample angle to allow A/C unit’s run-off water to safely and efficiently collect into one back corner of collection pan (in our case, the back-left corner);
- Cut small hole at base of water-collection pan in separator wall between Zone 2 & Zone 3 to allow water to pass from Zone 3 into Zone 2. Punch hole at back of water-collection pan in Zone 2, where water can drain out through a drainage tube;
- Install a leak-proof drainage tube long enough to run down through infrastructure of teardrop trailer until it reaches the outside of the teardrop trailer’s underbelly (Note: we punched a hole in left-rear of collection pan and soldered copper tubing that we then ran through an interior wall to the underside of the teardrop trailer). REMEMBER: GRAVITY IS YOUR FRIEND, so MAKE SURE the water’s EXIT ROUTE IS ALL DOWNHILL! 🙂
- When ready to install A/C unit, use weather-proof sealant tape between rear of A/C unit and any framed areas A/C unit will butt up against to ensure a watertight installation.
Now, for the expanded Photo Log of our Teardrop Trailer air conditioning unit installation . . .
With this being our first attempt at building a teardrop trailer from scratch, we attempted to capture as many photos of our trailer build as we could. We did so STRICTLY FOR OUR OWN INFORMATION. Beyond family and friends, we never thought in a million years we’d show them to anyone else. And yet, here we are!
(Recall, this wasn’t a kit build, but a wing-it-as-you-go home-built teardrop trailer. We wanted (and knew we would need!) plenty of step-by-step evidence in case something didn’t work well afterwards. We’ve been fortunate and INFINITELY GRATEFUL that most things have worked great from the start. )
All said and done, making the correct cuts and creating the correct angles for the aluminum shields and separators was perhaps the most trying part of the build. It helped TREMENDOUSLY to use cardboard and foam board stencils to attain the best configuration and thus have templates to use when cutting and shaping the aluminum.
First we made a cardboard mock-up of the air conditioner, flushed out some ideas, and committed to a channel through which we would run the copper tubing that would serve as an egress of the air conditioner’s run-off water:


Then, we worked on framing the innards with aluminum sheeting and created a path for run-off water to exit the trailer :


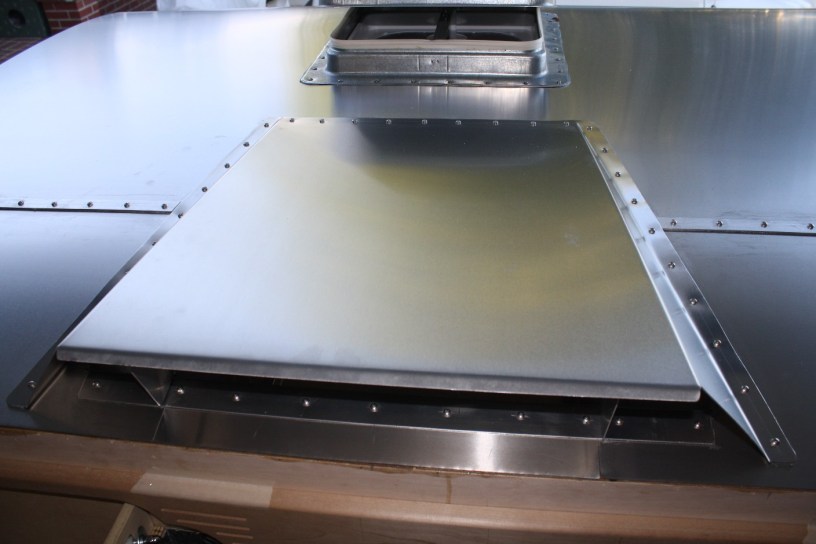
Next, we commited to cutting and forming the air conditioning system’s outer roof shield, AND we commit to applying the full aluminum skin to our trailer:


Final stages included installation of air conditioner’s aluminum roof-top vent shield and placement of protective plastic grill to keep the critters out:


See? That wasn’t so bad!
Actually, it was a bit more complicated than we thought. As with anything, you learn a whole lot about something when you’re forced to. I know WAY more about air conditioning systems than I thought I ever needed to or wanted to, but I actually feel the better for it. You will too. 🙂
If you have any questions, please don’t hesitate to ask. In the meantime, good luck to all of you out there bravely building your own teardrop trailers. We STILL look fondly at this teardrop trailer build as our favorite joint-project to date!
Say, if you liked this blog post,
be sure to FOLLOW US by using the buttons/links
on the upper-right side of this website
(email option, WordPress user option).
FOLLOW us on Facebook as well.
Happy trails, y’all!


Awesome Post, thanks! I’m going to copying your work, AC will be in on Monday.
Thank ya much! Hope it works out for ya. We’ve been happy with ours. 🙂
Excellent documentation. Thanks. Looks like the CampInn style AC an galley. They make a great TD.
Thanks, Mark. Appreciate that. The first teardrop we ever saw was a CampInn in 2011. We thought we might buy one, but hubby said, “I can make that,” and so we did the follow summer… by looking at photos online of finished CampInns and figuring it out. We altered features here and there, added what we wanted. Enjoyed her for 10 years and just recently sold her. 😊